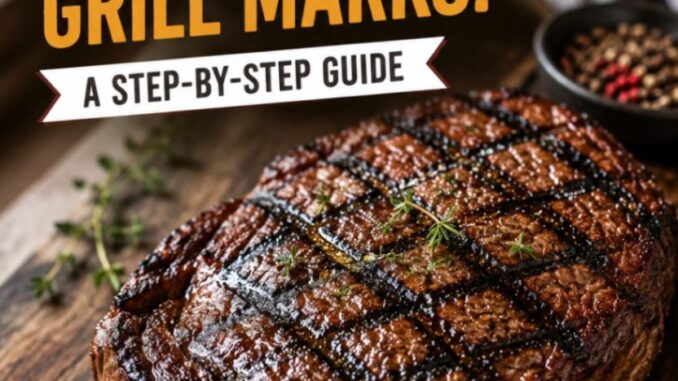
How to Get Perfect Grill Marks: A Step-by-Step Guide
There is a distinct reason why high-end steakhouses, food stylists, and seasoned backyard cooks take the time to score picture-perfect grill marks onto their food. Beyond the obvious visual appeal—that bold, crosshatched pattern that instantly signals a meal cooked over open flame—there is a genuine flavor transformation taking place beneath those dark lines.
That crosshatching is the result of direct thermal transfer and high-heat browning, creating concentrated pockets of intense, savory flavor across the surface of your meat and vegetables.
However, achieving crisp, clean, diamond-patterned grill lines without sticking, tearing, or burning your food is surprisingly rare. Most home cooks end up with grey, dull surfaces, smudged black streaks, or a piece of chicken that leaves half its outer layer welded to the grates.
Getting those ideal diamond marks isn’t a matter of luck or expensive equipment. It is entirely a matter of physics, timing, and preparation. Here is the step-by-step guide to mastering grill marks on any setup.
Step 1: Prep the Canvas (Clean and Season Your Grates)
You cannot get clean grill marks on dirty grates. Leftover carbon, burnt marinades, and residue from your last cookout act like an adhesive, binding to raw protein and tearing it apart when you try to lift or turn it.
Start by firing up your grill on high heat for at least ten to fifteen minutes with the lid closed. This incinerates old food particles into dry ash. Once the grill is hot, use a heavy-duty grill brush or a balled-up sheet of aluminum foil held with long tongs to scrape the grates completely bare.
After scraping, oil the grates. Take a folded paper towel, dip it lightly into a high-smoke-point oil like canola, avocado, or grapeseed oil, and use your tongs to wipe down the hot grates. You should see a gentle wispy smoke and a dark, glossy finish. This creates a temporary non-stick barrier crucial for a clean release.
Step 2: Control Moisture and Surface Temperature
The biggest enemy of a crisp grill mark is steam. If the surface of your meat or vegetable is wet when it hits the grate, the heat of the grill goes toward evaporating surface water rather than searing the food. This results in grey, steamed meat instead of sharp, dark grill lines.
-
Pat Everything Dry: Before seasoning, aggressively pat down your meat, fish, or vegetables with paper towels until the surface is completely dry.
-
Oil the Food, Not Just the Grate: Lightly coat the food itself with oil right before it hits the fire. Oil conducts heat far better than air or water, ensuring maximum thermal contact between the metal grate and the protein.
-
Mind the Salt Timing: If you salt your meat hours in advance, the salt will draw moisture to the surface. Either salt it well over an hour early so the moisture reabsorbs, or salt it immediately before it goes onto the grates.
Step 3: Establish High, Direct Heat
Grill marks require high, direct contact heat. You need the grates themselves to store and transfer enough thermal energy to sear the surface in seconds.
If you are using a gas grill, turn your main burners to high and close the lid for 10 to 15 minutes before cooking. Cast iron grates hold onto heat the best, followed by heavy-gauge stainless steel. Light wire grates struggle to hold enough thermal mass to produce thick, bold lines, so extra preheating time is mandatory for them.
If you are using charcoal, wait until the coals are completely covered in grey ash and glowing red. Set up your grill with all the lit coals concentrated on one side to create an intense direct-heat zone.
Step 4: The Clock-Position Angle Method
Creating symmetrical, photo-worthy crosshatches comes down to simple geometry. Think of your grill top as the face of an analog clock.
-
The First Contact (10 o’clock): Place your food down onto the hottest section of the clean, oiled grate. Angle the top end of the item toward 10 o’clock on an imaginary clock face.
-
Apply Initial Pressure: Lightly press down on the center of the food using a firm spatula or grill press for 3 to 5 seconds. This ensures total contact between the surface of the food and the hot metal, eliminating air gaps.
-
Leave It Alone: Do not nudge, flip, or move the food around. Let it sit undisturbed for 2 to 3 minutes over direct heat.
-
The Rotation (2 o’clock): Lift the food gently using a thin spatula or tongs. If it resists or feels stuck, let it cook for another 30 seconds until it naturally releases from the metal. Lift the item, rotate it so the top end points toward 2 o’clock, and lay it back down on a fresh, hot section of the grate right next to where it was sitting.
-
Set the Second Line: Press down gently once more and cook undisturbed for another 2 to 3 minutes.
-
The Flip: Flip the item over to repeat the process on the other side, starting back at the 10 o’clock position.
Step 5: Finish with the Two-Zone Method
A common trap cooks fall into is trying to get deep, dark grill marks on thick cuts of meat—like a two-inch ribeye or thick chicken breasts—and end up burning the exterior before the inside reaches the safe or desired internal temperature.
To avoid this, use the grill mark technique solely for the initial searing phase.
Once you have set your diamond pattern on both sides over high direct heat (which takes a total of 6 to 8 minutes), immediately transfer the food to the cooler, indirect-heat side of your grill. Close the lid and let the ambient heat gently roast the interior of the food until it reaches your target internal temperature. This preserves your pristine grill marks without turning the outer surface into bitter carbon.
Guidelines for Different Foods
-
Steaks and Pork Chops: Ideal thickness is at least 1 to 1.5 inches. High direct heat works best. Rotate once per side using the 10 o’clock to 2 o’clock method.
-
Chicken Breasts and Thighs: Chicken skin contains fat that flares up easily. Keep a cool zone open to move the chicken if flames erupt, and stick strictly to medium-high heat (around 400°F) to avoid charring raw poultry.
-
Fish Fillets: Use heavy oiling and ensure grates are immaculate. Turn delicate fish using a thin metal fish spatula. Rotate only if the fish is firm (like swordfish or tuna); delicate white fish should only be seared on one angle per side to prevent breaking.
-
Vegetables: Slice thick slabs of zucchini, eggplant, or onion vertically. Coat lightly with oil and sear quickly over high heat, rotating once for a clean pattern before removing immediately to maintain a crisp texture.
Leave a Reply