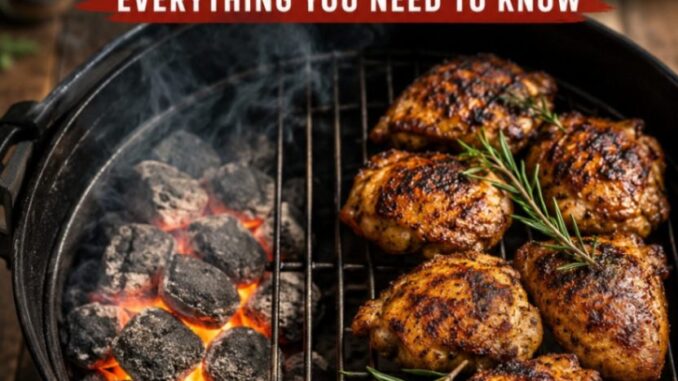
How to Build a Two-Zone Fire: Everything You Need to Know
If you have spent any time around a grill, you have likely experienced the classic backyard BBQ disaster. You lay out a fresh batch of thick chicken thighs or a beautifully marbled steak, place them directly over a bed of roaring coals, and close the lid. Five minutes later, grease flare-ups have engulfed your meal in aggressive flames. You rush to save it, only to serve meat that is charred like carbon on the outside while remaining cold and uncooked near the bone.
It is a frustrating rite of passage for almost every outdoor cook. But the solution isn’t buying a more expensive grill, using special fuel, or constantly spraying water on flare-ups. The secret to total control over your grill is mastering a simple, fundamental technique known as the two-zone fire.
Whether you are using a basic kettle charcoal grill, a ceramic smoker, or a multi-burner gas setup, building a two-zone fire is the single most valuable skill you can learn. It turns your grill from a blunt instrument into a versatile, precision cooking station. Here is everything you need to know to master the two-zone setup and never burn dinner again.
What Is a Two-Zone Fire?
At its core, a two-zone fire means dividing your grill into two distinct temperature environments under a single lid: a direct heat zone and an indirect heat zone.
-
The Direct Heat Zone: This is the area directly above your active heat source (charcoal, gas burners, or wood briquettes). It produces intense, radiant heat ranging anywhere from 400°F to 650°F or higher. This zone is designed for rapid searing, creating rich crusts, and cooking thin, fast-cooking foods.
-
The Indirect Heat Zone: This is the area of the grill grate where there is no direct heat source immediately beneath it. Instead, it relies on warm air circulating around the food, acting exactly like a convection oven. Temperatures here usually hover between 225°F and 350°F depending on how hot your primary zone is running.
By dividing your grill grate into these two spaces, you get the best of both worlds: high heat for building flavor and deep browning, and moderate indirect heat for gently cooking food through to the center without burning the exterior.
Why You Need a Two-Zone Setup Every Time You Grill
Many beginners make the mistake of spreading glowing coals evenly across the entire bottom of the grill or turning all gas burners on high. While that works fine if you are quickly cooking thin hot dogs or thin skirt steaks for a crowd, it leaves you with zero margin for error for almost everything else.
Here are the primary reasons why a two-zone setup should be your default grilling configuration:
1. Built-In Temperature Control
Food comes in all shapes and thicknesses. A thick pork chop requires time for heat to travel to its center, but high direct heat will burn the surface before that happens. On a two-zone setup, you can roast the meat gently on the indirect side until it is nearly done, then slide it over to the direct side for a brief 60-second sear to finish it off.
2. A Dedicated Safe Zone for Flare-Ups
Fat renders as meat cooks. When rendered fat drips onto hot coals or burner covers, it ignites, producing burst flames that impart soot and acrid tastes to your food. With a two-zone fire, if a flare-up happens, you don’t need to panic or douse your coals with water. You simply use tongs to slide the food over to the indirect zone until the fire dies down.
3. Greater Menu Flexibility
A two-zone setup allows you to cook completely different types of food simultaneously. You can sear burgers over direct heat on the left while slowly roasting delicate asparagus wrapped in foil on the right, all under the same lid.
Guidelines for Building a Two-Zone Fire on a Charcoal Grill
Charcoal grills are the undisputed king of two-zone cooking because you can physically stack and shape your fuel bed. Follow these guidelines carefully to build a clean, efficient two-zone fire in any charcoal kettle or ceramic grill.
Guideline 1: Clean Out Old Ash First
Before lighting a single piece of charcoal, sweep out all remaining ash from your previous cook. Trapped ash restricts airflow from the bottom vents, making it difficult for oxygen to feed your fire and resulting in sluggish, dirty-tasting smoke.
Guideline 2: Use a Charcoal Chimney Starter
Skip the lighter fluid. Lighter fluid introduces chemical odors and produces unpredictable bursts of heat. Instead, fill a standard chimney starter with quality hardwood lump charcoal or briquettes. Place a fire starter cube underneath, light it, and let the chimney burn for 15 to 20 minutes until the top coals are covered in light gray ash.
Guideline 3: Bank the Coals on One Side
Dump the hot, ash-covered coals onto one half of the lower charcoal grate. Use a long-handled grill spatula or coal rake to push all the fuel into a consolidated mound taking up roughly 40% to 50% of the grate area. Keep the remaining side completely clear of coals.
Guideline 4: Optimize Coal Density
Stack your banked coals two to three layers deep. Stacking coals creates higher concentrated thermal energy than a thin single layer, keeping your direct zone scorching hot while allowing your indirect zone to stay stable and clean.
Guideline 5: Set Up the Cooking Grate and Lid Vents
Place the top cooking grate back on the grill and put the lid on. Position the lid’s top vent directly over the indirect (cool) side. This is critical: as heat rises from the charcoal bank, oxygen will enter through the bottom vents, travel across the food on the indirect side, and pull smoke and hot air up and out through the lid vent.
Guidelines for Building a Two-Zone Fire on a Gas Grill
While charcoal offers authentic smoky flavor, gas grills offer unmatched convenience. You can easily set up two-zone heat on a gas grill by controlling your burner knobs.
Guideline 1: Know Your Burner Layout
Gas grills generally have burners running either left-to-right or front-to-back. Identify how your burners run so you can turn off specific sections to create your indirect zone.
Guideline 2: Light Half the Burners
For a three-burner grill, turn two burners on one side (for example, Left and Center) to Medium-High or High, and leave the rightmost burner completely Off. For a two-burner grill, turn the Left burner to Medium-High and leave the Right burner Off.
Guideline 3: Preheat with the Lid Down
Allow the gas grill to preheat with the lid closed for 10 to 15 minutes. This ensures that the grates on your direct side absorb plenty of heat for searing, while ambient heat fills the interior hood to heat the indirect side.
Cooking Strategies: When to Use Which Zone
Once your two-zone fire is established, you need to decide how to cook your specific ingredient. There are three main approaches to cooking on a two-zone setup.
Strategy 1: Direct-First Searing (Fast & Thin Foods)
-
Best For: Skirt steaks, flank steaks, thin burgers, hot dogs, asparagus, and sliced onions.
-
How It Works: Place the food directly over the high-heat zone. Cook quickly with the lid off or partially closed, flipping often to build a brown crust. If the exterior gets dark before the inside reaches your target temperature, slide the food to the indirect side to finish cooking gently.
Strategy 2: Indirect-First Roasting (Thick & Large Cuts)
-
Best For: Whole chickens, thick pork chops, bone-in chicken thighs, sausages, and ribs.
-
How It Works: Place the food on the indirect side, close the lid, and let it bake at moderate heat (300°F to 350°F) until it is within 10 degrees of its final internal temperature. Finish by transferring it to the direct heat zone for a quick 2-minute sear to brown the skin or crust.
Strategy 3: The Reverse Sear (Thick Steaks & Roasts)
-
Best For: Steaks thicker than 1.5 inches, rack of lamb, and tri-tip roasts.
-
How It Works: Start the thick cut on the indirect side at a low temperature (around 225°F to 250°F). Slow-roast it until the internal temperature reaches roughly 115°F to 120°F (for medium-rare). Then, move it over to a scorching hot direct zone for 60 to 90 seconds per side. This produces an edge-to-edge pink interior with a deep mahogany crust.
Vital Temperature Guidelines to Follow
To ensure safety and optimal flavor, keep these simple guidelines in mind whenever you fire up the grates:
-
Use a Digital Thermometer: Never rely on the built-in dome thermometer on your grill lid. It measures ambient air near the top of the dome, not the temperature at the grate surface where your food sits. Use a dual-probe digital thermometer placed on the indirect grate surface for accurate readings.
-
Manage Your Air Vents: On charcoal grills, airflow dictates temperature. If your indirect zone is running too hot, close your top or bottom intake vents halfway to reduce oxygen flow. If it is running too cool, open the vents fully to boost the fire.
-
Resist Opening the Lid Frequently: Every time you lift the grill lid, you release accumulated convection heat from the indirect zone. Keep the lid closed as much as possible, opening it only to flip, sear, or check internal meat temperatures.
Final Thoughts
Mastering the two-zone fire is the ultimate stepping stone from casual backyard enthusiast to confident pitmaster. It eliminates the guesswork, protects your meal from flare-up damage, and gives you complete authority over how heat hits your food. The next time you fire up your grill, bank those coals or turn off a burner—your steaks, chops, and chicken will thank you for it.
Leave a Reply