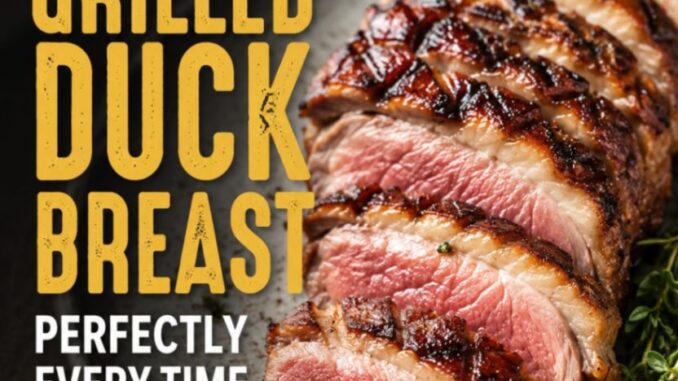
How to Grill Duck Breast Perfectly Every Time
If the thought of throwing duck breast on a hot grill makes you a little nervous, you are not alone. Most folks worry about ending up with tough, chewy meat or, worse, creating a massive grease fire from all that rendered fat. I used to feel the exact same way until I realized that grilling duck isn’t like cooking a steak. Once you master a couple of straightforward temperature tricks, duck breast quickly becomes one of the easiest, most impressive meals you can make on your back patio.
The secret comes down to fat management and patience. Duck breast carries a rich, luxurious layer of fat underneath the skin that needs time to render down so the skin turns shattering-crisp while the meat stays tender and juicy. In this guide, I will walk you through the simple technique to grill duck breast perfectly every time without any flare-ups or fuss.
Why You Will Love This Method
-
Restaurant Quality at Home: You get that rich, savory flavor and crisp skin usually reserved for high-end bistros right off your own backyard grill.
-
No Flare-Up Frustration: Using a two-zone heat setup keeps you completely in control of the rendering process, avoiding wild flames.
-
Simple Seasoning: Duck has incredible natural depth, so you do not need fancy marinades—just salt, pepper, and proper heat.
-
Quick Cooking Time: Once your grill is preheated and your duck is scored, the actual cooking takes under twenty minutes.
Ingredients You Need
To keep things straightforward and let the natural richness of the duck shine, you only need a handful of basic pantry staples:
-
2 Boneless Duck Breasts (approx. 6 to 8 ounces each): Look for Pekin (often labeled Long Island duck) for a milder taste and tender texture, or Moulard for a larger, beefier breast with a thicker cap of fat. Fresh or fully thawed frozen breasts work equally well.
-
1½ Teaspoons Coarse Kosher Salt: Kosher salt has larger grains that adhere evenly and draw out just enough moisture to create a crisp crust.
-
¾ Teaspoon Freshly Cracked Black Pepper: Coarsely ground pepper adds a nice bite that cuts right through the richness of the fat.
-
Optional Glaze: 2 tablespoons of orange marmalade or honey mixed with 1 tablespoon of balsamic vinegar for a subtle sweet-and-savory finish in the final minutes of grilling.
Simple Ingredient Substitutions
-
Kosher Salt: Sea salt works as a fine substitute. If you only have fine table salt on hand, cut the amount down to 1 teaspoon so you do not over-salt the meat.
-
Pekin vs. Moulard: If you buy wild duck breasts from a hunting trip, keep in mind they are significantly leaner than farm-raised ducks. You will render less fat and need slightly less time on the grill.
-
Sweet Finish: Instead of orange marmalade, a spoonful of cherry preserves or plum jam mixed with a dash of soy sauce creates a fantastic alternative glaze.
Recommended Kitchen & Grill Equipment
Having the right gear ready makes the process smooth and stress-free:
-
Gas or Charcoal Grill: Any standard outdoor grill works great, provided you can set up two temperature zones (hot side and cool side).
-
Sharp Chef’s Knife or Pairing Knife: Essential for scoring the fat layer without slicing into the delicate meat below.
-
Instant-Read Digital Meat Thermometer: Duck breast is best served medium-rare to medium 130 degree celcius to 135 degree celcius internal temperature). A reliable digital thermometer removes all guesswork.
-
Long-Handled Tongs: Gives you safe control when moving duck near open heat.
-
Paper Towels: Essential for patting the duck thoroughly dry before seasoning.
Step-by-Step Instructions
Step 1: Prep and Score the Fat Layer
Take your duck breasts out of the refrigerator about 20 to 30 minutes before grilling to take the cold chill off. Dry them completely using paper towels; moisture on the skin is the enemy of crispiness.
Using your sharpest knife, gently score the fat in a crosshatch diamond pattern, spacing the cuts about half an inch apart. Cut through the white fat, but stop just short of hitting the dark red meat underneath. Scoring gives the rendering fat an easy path to melt out, allowing the skin to crisp up evenly.
Pro Tip: If your knife cuts into the meat, the meat juices will escape during grilling, making the breast dry. Take your time with shallow, light passes.
Step 2: Season Generously
Season both sides of the duck breasts with the kosher salt and freshly cracked black pepper. Pay extra attention to rubbing the salt into the crosshatch scores you just made.
Step 3: Set Up a Two-Zone Grill
Set your grill for two-zone cooking:
-
For Gas Grills: Turn one or two burners to medium-low heat 300 degree celciusto 325 degree celcius and leave the other burners off completely.
-
For Charcoal Grills: Pile your lit coals onto one half of the grill grate, leaving the other half completely empty.
Clean the grates thoroughly with a wire brush. You do not need to heavily oil the grates because the duck fat will provide plenty of lubrication as it renders.
Step 4: Start Low on the Indirect (Cool) Side
Place the duck breasts skin-side down on the cooler, indirect side of your grill. Close the lid and let them render for about 10 to 12 minutes.
Starting on indirect heat slowly warms the fat layer, rendering it into liquid without burning the skin or causing immediate grease fires on open flames. You will hear a steady sizzle, and the white fat layer will visibly shrink and thin out.
Step 5: Sear Over Direct Heat
Once most of the fat has rendered and the skin looks golden and translucent, use your tongs to move the duck breasts over to the direct heat side of the grill, skin-side down.
Keep the grill lid off during this step so you can watch closely. Grill over direct heat for 2 to 3 minutes until the skin turns deep mahogany brown and shatters when tapped with your tongs. If a small flare-up occurs, simply slide the breast back to the indirect side for a few seconds until the flame dies down.
Step 6: Flip and Finish
Flip the duck breasts over to meat-side down on the indirect heat side. If you are using a glaze, brush a thin layer onto the skin now.
Close the lid and cook for another 3 to 5 minutes, checking the thickest part of the breast with an instant-read thermometer:
-
Rare: 125degree celcius
-
Medium-Rare (Recommended): 130degree celcius$ to 135degree celcius
-
Medium: 140degree celcius
Pull the duck off the grill when it sits 5 degrees below your target temperature, as carryover cooking will raise the internal heat while resting.
Step 7: Rest and Slice
Transfer the duck breasts skin-side up to a cutting board and let them rest undisturbed for 8 to 10 minutes. Slicing too early lets all the savory juices leak onto your board.
Once rested, slice the duck thinly across the grain at a slight bias, and serve immediately while the skin is piping hot.
Expert Tips for Success
-
Dry Skin Equals Crisp Skin: Leave your unbagged duck breasts uncovered on a paper-towel-lined plate in your fridge overnight before cooking. The dry refrigerator air dehydrates the skin surface, yielding unbeatable crunch.
-
Save the Duck Fat: If you grill on a solid cast-iron griddle accessory, collect the rendered fat! Duck fat can be stored in a jar in the fridge for months and makes the best roasted potatoes you will ever eat.
-
Rest Skin-Side Up: Always rest your cooked duck breast skin-side up. If you rest it skin-side down, trapped steam will turn that beautifully crisp skin soft and rubbery.
Common Mistakes to Avoid
-
Grilling Over High Direct Heat Right Away: Throwing duck breast straight over hot coals or high gas flames cooks the exterior before the fat renders, leaving you with burnt skin and thick, chewy, unrendered fat underneath.
-
Cutting Into the Meat While Scoring: Slicing too deep punctures the meat, letting juices run out during rendering and leaving you with dry duck.
-
Overcooking the Meat: Duck breast is a dark meat poultry that cooks much more like a sirloin steak than a chicken breast. Cooking duck well-done 165 degree celcius results in a dry, gamey, liver-like texture. Aim for medium-rare.
-
Skipping the Rest Period: Cutting into duck straight off the grill drains the moisture immediately. Let those muscle fibers relax so the juices stay inside every bite.
How to Store Leftovers
-
Refrigeration: Store cooled leftover duck breast in an airtight container in the refrigerator for up to 3 days.
-
Freezing: Wrap cooked duck tightly in plastic wrap and aluminum foil, then store in a freezer bag for up to 2 months. Thaw overnight in the fridge before reheating.
How to Reheat Without Losing Crispness
Reheating duck in the microwave will make the meat rubbery and the skin soggy. Instead, try these gentle methods:
-
Skillet Method (Best Option): Place a dry skillet over low heat. Add the leftover duck breast skin-side down and let it warm gently for 4 to 6 minutes. The residual fat in the skin will heat up and crisp right back up without overcooking the meat inside.
-
Oven or Toaster Oven: Preheat your oven to 300 degree celcius. Place the duck on a wire rack over a baking sheet and heat for 8 to 10 minutes until warmed through.
Estimated Nutrition Information
Per Serving (Based on a 6-ounce duck breast, skin eaten, unglazed)
| Metric | Amount |
| Calories | ~330 kcal |
| Protein | 28 g |
| Total Fat | 24 g |
| Saturated Fat | 8 g |
| Carbohydrates | 0 g |
| Sodium | 480 mg |
(Note: Nutritional values are estimates and will vary based on breast size and how much fat is rendered during the grilling process.)
Leave a Reply