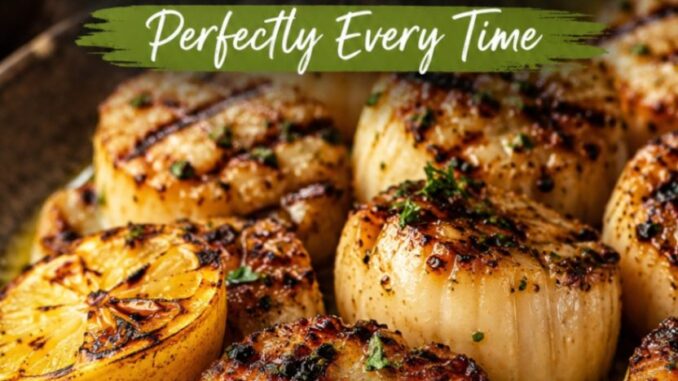
How to Grill Scallops Perfectly Every Time
Few foods feel as special or reward you as quickly as sea scallops hot off the grate. When you learn how to grill scallops perfectly every time, you gain a high-impact, restaurant-quality meal that takes less than five minutes of actual cooking time.
The secret isn’t fancy gear or complicated marinades. It comes down to dry surfaces, direct high heat, and knowing exactly when to pick them up off the fire. Once you master a few basic habits, you’ll turn out sweet, tender scallops with a rich golden crust whenever the craving strikes.
Why You’ll Love This Recipe
-
Lightning Fast: Prep takes ten minutes, and the cooking itself wrapped up in under four minutes.
-
Foolproof Crust: A precise drying technique ensures a deep, caramelized sear without overcooking the delicate center.
-
Naturally Rich: Sea scallops have a clean, sweet flavor that shines with basic kitchen staples like olive oil, butter, and fresh lemon.
-
Effortless Hosting: You can do all the prep work ahead of time, leaving you free to entertain until it’s time to fire up the grill.
Ingredients
To get the best results, focus on high-quality ingredients. Because scallops have a subtle sweetness, every element on this list plays a clear supporting role.
-
1.5 pounds Large Sea Scallops (U-10 or U-12 count): Look for “dry-pack” scallops. They have no added water or chemicals, which allows them to sear instead of steam.
-
2 tablespoons High-Smoke Point Oil: Avocado oil, canola oil, or light olive oil works best to handle direct flame without scorching.
-
2 tablespoons Unsalted Butter: melted, for brushing during the final seconds of cooking.
-
1 teaspoon Kosher Salt: Flaky kosher salt draws out sweet flavors and helps build a crust.
-
1/2 teaspoon Freshly Cracked Black Pepper: Coarse pepper adds a subtle bite without overpowering the seafood.
-
1 Lemon: Cut into wedges for serving. Fresh acid cuts through the natural richness instantly.
-
2 tablespoons Chopped Fresh Parsley: Adds a bright pop of color and clean herbal contrast right before serving.
Ingredient Substitutions
-
Oil Options: Ghee or clarified butter works exceptionally well in place of avocado oil because it handles high temperatures without burning, adding a rich, nutty flavor right from the start.
-
Citrus Tweaks: Fresh lime juice or a splash of white wine mixed into melted butter provides a lighter, brighter finish if you want a change from lemon.
-
Herbs: Swap fresh parsley for tarragon, chives, or dill depending on what you have in your garden or fridge. Tarragon offers an anise-like note that pairs naturally with sweet shellfish.
Equipment Needed
-
Gas or Charcoal Grill: Capable of reaching high direct heat (450°F to 500°F).
-
Paper Towels: Crucial for removing every trace of surface moisture.
-
Grill Grate Basket or Fine Mesh Skewers: Skewers prevent small or soft scallops from slipping through the grates into the coals.
-
Long-Handled Tongs: Gives you quick control over individual scallops without exposing your hands to intense radiant heat.
-
Silicone Basting Brush: For applying melted butter quickly on the grill.
Step-by-Step Instructions
Step 1: Thaw and Dry Completely
If using frozen scallops, thaw them slowly overnight in the refrigerator. An hour before cooking, place the scallops between several layers of paper towels. Press down gently with your palms.
Why this matters: Water is the enemy of a proper sear. Excess moisture turns into steam the second it hits the grill, boiling the outside instead of crisping it.
Step 2: Remove the Side Muscle
Examine each scallop. Look for a small, tough rectangular tab of tissue on the side (the “foot” or side muscle). Pinch it between your thumb and forefinger and pull it off. It peels away easily.
Why this matters: While edible, this muscle turns chewy and tough when cooked over high heat. Removing it ensures every bite remains meltingly tender.
Step 3: Clean and Prep the Grill Grates
Scrape your grill grates until they are completely clean of debris. Dip a rolled-up paper towel in vegetable oil using your tongs, and rub the grates lightly right before placing the scallops down.
Why this matters: Scallops stick easily to dirty or un-oiled metal. A slick surface keeps the crisp outer crust attached to the scallop instead of the grill grate.
Step 4: Season Just Before Cooking
Lightly coat both sides of the scallops with your avocado oil, then sprinkle generously with kosher salt and black pepper. Do not salt them too early, as salt draws interior moisture out to the surface.
Step 5: High-Heat Sear
Place the scallops on the hot grill grates over direct heat. Leave at least an inch of space between each piece so heat circulates freely. Close the lid and let them sear undisturbed for 90 to 120 seconds.
Sensory Check: You will hear an immediate, energetic sizzle. The bottoms will turn opaque, and an amber-colored ring will form along the bottom edge.
Step 6: Flip and Baste
Gently slip your tongs or a thin metal spatula under each scallop. They should release naturally; if they stick, give them another 15 seconds. Flip them over, brush the tops with melted butter, and cook for another 60 to 90 seconds.
Doneness Check: Scallops are ready when the edges are firm to a gentle touch, the center remains slightly springy, and the core turns translucent-to-opaque (internal temperature of 115°F to 120°F). Remove them immediately.
Step 7: Rest and Serve
Transfer the scallops to a warm platter. Squeeze fresh lemon juice over the top and garnish with chopped parsley. Rest for two minutes before serving.
Expert Tips
-
Buy “Dry-Pack” Scallops: Always check the label or ask the seafood counter for dry-pack sea scallops. “Wet-pack” scallops are treated with sodium tripolyphosphate to retain water weight; they shrink drastically, leach liquid into the fire, and have a muted, slightly chemical taste.
-
Use Double Skewers: If using wooden or metal skewers to handle scallops easily, insert two parallel skewers through each row of scallops rather than one. Double skewers stop the scallops from spinning around when you flip them.
-
Keep the Lid Closed: Resist the urge to peek constantly. Closing the grill lid retains intense top-down heat, cooking the interior quickly without drying out the exterior.
-
Look for Natural Release: Never force a scallop off the grate. When a proper crust forms, the protein releases itself from the metal easily.
Common Mistakes to Avoid
-
Overcrowding the Grill: Putting scallops too close together traps steam between them. Leave breathing room around each piece for proper air circulation.
-
Cooking Cold Seafood: Cold scallops dropped onto hot grates lower the temperature instantly and cook unevenly. Let scallops sit on the counter for 15 minutes before cooking to take the chill off.
-
Overcooking: Scallops continue cooking for a minute after being pulled off the fire. If you wait until they feel completely firm on the grill, they will turn rubbery on the plate. Remove them when the centers are still slightly soft.
-
Skipping the Oil on the Grates: Because scallops are lean, they need grease on the grates, even if you oiled the seafood itself.
Storage
-
Refrigeration: Store leftover cooked scallops in an airtight glass container in the fridge for up to two days.
-
Freezing: Freezing cooked scallops is not recommended. The cold alters their delicate texture, making them spongy upon thawing.
Reheating
Reheating scallops takes care to avoid toughening the delicate protein.
-
Skillet Method (Recommended): Melt a teaspoon of butter in a nonstick skillet over medium-low heat. Add the leftover scallops and heat for roughly 60 seconds per side, just until warmed through.
-
Avoid the Microwave: The microwave cooks seafood unevenly and turns tender scallops rubbery within seconds.
Nutrition Information (Estimated)
Serving Size: 1/4 of recipe (approx. 5-6 oz cooked sea scallops)
-
Calories: 210 kcal
-
Total Fat: 10g
-
Saturated Fat: 3.5g
-
Cholesterol: 65mg
-
Sodium: 680mg
-
Total Carbohydrates: 4g
-
Protein: 24g
When you focus on dry surfaces and high direct heat, grilling sea scallops becomes one of the most rewarding quick meals you can make outdoors. Keep a close eye on the timer, trust the natural release off the grates, and enjoy tender, caramelized results every single time.
Leave a Reply