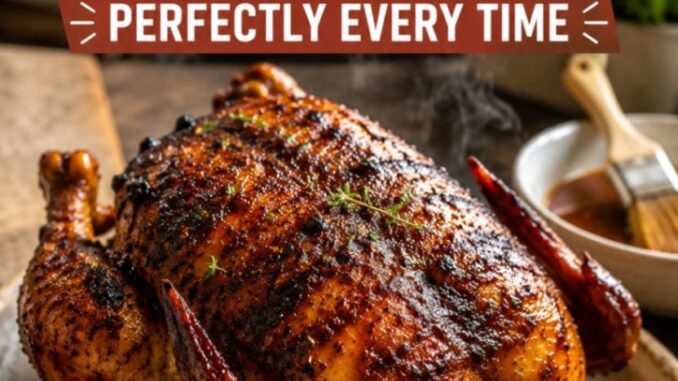
How to Grill Smoked Whole Chicken Perfectly Every Time
If you have ever pulled a bird off the grate only to find tough, rubbery skin and dry breast meat, you know how disappointing a whole chicken can be. Getting that rich, deep smoke flavor into the meat while keeping the inside juicy and the skin bite-through crisp takes a specific approach, but once you master it, you will rarely want to cook chicken any other way.
Learning how to grill smoked whole chicken perfectly every time comes down to managing two temperature zones, keeping the bird flat, and giving the skin enough heat to render the fat properly. Grab a cold drink, fire up the grill, and let’s talk about how to get this right on your very next try.
Why You’ll Love This Recipe
-
Bite-through skin that isn’t rubbery: Spatchcocking the bird allows every inch of skin to sit flat against the heat, rendering fat evenly without drying out the meat beneath.
-
Balanced smoke flavor: By using a gentle hardwood blend, you get an authentic, wood-fired taste that enhances the chicken without overpowering it.
-
Foolproof cooking time: Cooking a whole chicken intact often leads to overcooked breasts or raw thighs. Laying it flat ensures both heat zones cook at the exact same pace.
-
Versatile leftover potential: The subtle smoky profile makes leftover meat perfect for tacos, grain bowls, soups, or the best chicken salad you’ll ever taste.
Ingredients
To get the best result on the grill, start with a quality bird and simple pantry staples.
-
Whole chicken (4 to 5 lbs): Look for a bird with tight, unbroken skin and no heavy air pockets underneath.
-
Kosher salt (1.5 tbsp): Coarse kosher salt draws out moisture, seasons deep into the muscle fibers, and helps crisp the skin.
-
Unsalted butter (4 tbsp, melted): Brushed on during the last phase of cooking, butter gives the skin a rich, golden sheen and helps build that crackly finish.
-
Coarse black pepper (1 tbsp): Freshly cracked black pepper provides a sharp bite that cuts through the rich wood smoke.
-
Garlic powder (1 tsp) & Onion powder (1 tsp): These savory staples create a balanced base layer of flavor that complements the smoke without burning easily.
-
Smoked paprika (1 tsp): Gives the rub a subtle warmth and provides a gorgeous mahogany color as the chicken absorbs the heat.
-
Dried thyme (1/2 tsp): Adds a subtle, earth-toned herbal note that pairs naturally with poultry.
Ingredient Substitutions
-
Kosher Salt: If you only have table salt on hand, cut the measurement in half. Fine salt packs much tighter, and using the full tablespoon-and-a-half will make the bird far too salty.
-
Butter: Ghee (clarified butter) or avocado oil can be used in place of standard unsalted butter. Avoid extra virgin olive oil for the final brush, as its low smoke point can scorch and turn bitter over hot coals.
-
Spice Adjustments: Feel free to swap in dark brown sugar (1 tablespoon) if you prefer a sweet, competition-style rub, though you will need to monitor your fire closely toward the end so the sugar doesn’t scorch.
Equipment Needed
-
A grill with a lid: A standard kettle grill, a pellet smoker, or a multi-burner gas grill all work great.
-
Heavy-duty kitchen shears: Standard scissors will struggle to cut through the backbone; dedicated poultry shears make this task fast and safe.
-
Wood chunks or chips: Apple, cherry, or pecan wood provides a sweet, mild smoke profile that will not overpower light poultry meat.
-
An instant-read digital thermometer: This is non-negotiable for safe, tender chicken. Relying strictly on cooking time leads to dry meat.
-
A large rimmed baking sheet: Essential for prepping, dry-brining, and moving the chicken to and from the grill without dripping juices everywhere.
Step-by-Step Instructions
Step 1: Spatchcock the Chicken
Place the bird breast-side down on a clean cutting board with the tail facing toward you. Take your kitchen shears and cut along one side of the spine from the tail all the way up to the neck cavity. Repeat the cut along the opposite side of the spine and remove the bone entirely (save it in a freezer bag for future chicken stock).
Flip the chicken over so the breast side faces up. Place the palm of your hand flat over the center of the breastbone and press down firmly until you hear a clear snap. The chicken should now rest completely flat.
Visual Check: If the legs are pointing inward or the center breast stands significantly taller than the thighs, give the breastbone another firm press. A flat chicken cooks evenly.
Step 2: Season and Dry-Brine
Pat the chicken completely dry with paper towels— moisture is the enemy of crisp skin. Mix the kosher salt, pepper, garlic powder, onion powder, paprika, and thyme in a small bowl.
Generously sprinkle the rub all over the chicken, making sure to season both sides and under the wings. For the best skin texture, place the uncovered chicken on a wire rack inside a baking sheet and pop it in the refrigerator for at least 4 hours (or overnight). The air circulation dries out the outer layer of skin, prepping it to crisp up beautifully over the fire.
Step 3: Set Up Two-Zone Heating
Set up your grill for indirect cooking at a temperature between 250°F and 275°F.
-
Charcoal Grill: Push lit coals to one side of the grate and place a drip pan filled with an inch of water on the empty side. Add two medium chunks of apple or pecan wood to the coals.
-
Gas Grill: Turn on one or two burners on one side and leave the other burners off. Place wood chips in a smoker box or foil packet directly over the hot burner.
-
Pellet Grill: Set the unit to 250°F using a fruitwood pellet blend.
Step 4: Smoke Low and Slow
Place the spatchcocked chicken on the cool side of the grill, skin-side up, with the legs facing closer to the heat source (since leg meat handles higher heat better than breast meat). Close the lid.
Maintain a light, blue smoke coming from the vents. Avoid heavy, thick white smoke, which leaves a bitter taste on the skin. Let the chicken smoke undisturbed for about 60 to 75 minutes, or until the thickest part of the breast reaches an internal temperature of around 135°F to 140°F.
Step 5: High-Heat Finish & Baste
Brush the chicken all over with the melted butter. Now, raise the grill temperature to 400°F (or carefully move the bird skin-side down over the direct heat zone on a charcoal grill for a few minutes, keeping a close eye out for flare-ups).
This sudden blast of heat renders the remaining skin fat and browns the butter solids, crisping up the skin. Continue cooking skin-side up on the indirect side until the breast meat registers 165°F and the thickest part of the thigh hits 175°F on your instant-read thermometer.
Step 6: Rest Before Carving
Transfer the chicken to a cutting board and let it sit uncovered for 10 to 15 minutes before slicing. Cutting into it immediately causes all the flavorful juices to pour out onto the board instead of staying in the meat.
Expert Tips
-
Tuck the Wing Tips: Fold the wing tips back and tuck them behind the upper breast joints before placing the chicken on the grill. This prevents the small tips from scorching before the rest of the bird finishes cooking.
-
Trust Internal Temps, Not Clocks: Cooking times vary based on ambient weather, wind, and minor grill fluctuations. Pull the chicken based purely on what your digital thermometer tells you.
-
Avoid the Water Bath: Do not spritz or mop the skin with juice or vinegar during the smoking phase. While liquid adds flavor to pork shoulders, adding moisture to chicken skin guarantees rubbery results.
-
Use Fruitwoods: Poultry absorbs smoke faster than beef or pork. Mild hardwoods like cherry, apple, and peach give a rich mahogany color without dominating the natural flavor of the meat.
Storage
-
Refrigerator: Store leftover carved chicken in an airtight container for up to 4 days. Keep any leftover skin separated if you plan to crisp it up again later.
-
Freezer: Shred or chop the cooked meat and pack it into freezer-safe vacuum bags or freezer bags, pressing out as much air as possible. Frozen smoked chicken retains great quality for up to 3 months.
Reheating
-
Oven Method (Best Result): Preheat your oven to 350°F. Place the leftover chicken pieces in a baking dish, add a splash of chicken broth to the bottom, and cover tightly with aluminum foil. Bake for 15 to 20 minutes until warm. Uncover for the last 5 minutes if you want to crisp the skin back up.
-
Air Fryer Method (Fastest): Set the air fryer to 350°F. Place leftover pieces inside and heat for 4 to 6 minutes. This heats the meat through while restoring crispiness to the skin without drying things out.
Nutrition Information (Estimated)
Serving Size: 1/4 of chicken (approx. 6 oz cooked meat with skin)
-
Calories: 420 kcal
-
Total Fat: 26g
-
Saturated Fat: 8g
-
Cholesterol: 135mg
-
Sodium: 680mg
-
Carbohydrates: 1g
-
Dietary Fiber: 0g
-
Sugars: 0g
-
Protein: 44g
Note: Nutritional values are estimates based on standard calculations and can vary depending on the exact weight of the bird and rub applications.
Leave a Reply